Project 1
Due: Jun 18, before midnight.
Important Reminder: As per the course Academic Honesty Statement, cheating of any kind will minimally result in your letter grade for the entire course being reduced by one level.
This document first provides the aims of this project followed by the necessary background. It then lists the requirements as explicitly as possible. This is followed by a log which should help you understand the requirements. Finally, it provides some hints as to how those requirements can be met.
Aims
The aims of this project are as follows:
To verify that you have GUI access to your VM and have set up your VM as specified in the VM Setup and Git Setup documents.
To expose you to programming in TypeScript.
To encourage you to use advanced features of JavaScript and TypeScript in your code.
To familiarize you with the development environment on your VM.
To make you design an in-memory indexing scheme.
To expose you to the power of recursive programming.
To introduce you to Test-Driven Development TDD.
Background
This project involves building the internals of a spreadsheet with all data stored entirely in memory.
The reasons spreadsheets are extremely popular include:
An intuitive GUI.
An intuitive model of computation which just works. This model is so intuitive that non-programmers use it without realizing that they are programming.
In this project, we will concentrate on (2).
Visually, a spreadsheet is identified by a grid of cells with each
cell identified by its column and row coordinates. The column
coordinate is specified by a letter a, b, \(\ldots\), z while the
row coordinate is specified by an integer 1, 2, \(\ldots\), 99.
So the first cell would have coordinates a1 and the last cell would
have coordinates z99.
The model of computation behind spreadsheets is data-driven programming. The computation is driven entirely by the dependencies within the data rather than some predetermined order. So if a change is made to a particular spreadsheet cell \(c\), then that change is automatically propagated to all other cells which depend directly or indirectly on \(c\).
Assuming no cyclic dependencies, a spreadsheet can use a Directed Acyclic Graph or DAG to maintain the dependencies between its data cells. The use of a DAG will minimize the computation necessary to respond to a data change.
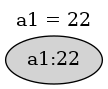
The following sequence of diagrams show how the DAG evolves in response to updates made to a spreadsheet:
A cell a1 is given a constant value.
We can add a formula referring to a cell b1 which has not yet been
given a value because the value of a cell defaults to 0.
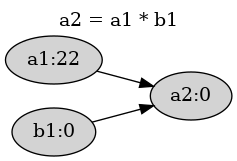
In the above figure, cell a2 is dependent on cells a1 and b1
while cells a1 and b1 are prerequisites for cell a2.
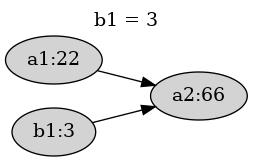
When we actually define b1, a2 is automatically updated
because a2 is dependent on b1.
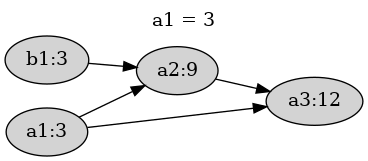
We can extend the dependency chains to a new cell a3:

When we change a1, those changes are propagated to all its direct
and indirect dependencies.
Besides the underlying DAG, another aspect of spreadsheets worth noting
is the location independence of formula; i.e. a formula can be copied
from one cell to another and doing so will adjust the cell references
in the formula. So for example, if the above formula a3 = a1 + a2
is copied over to cell c5, then it would be adjusted to
c5 = c3 + c4.
In some situations, this adjustment is not desired. This can be
specified by preceeding the corresponding coordinate by a $ to fix
that coordinate. For example, if the formula f2 = e5 + $e3 + e$4 +
$e$6 is copied over to g7, the copied formula would be g7 = f10 +
$e8 + f$4 + $e$6,
Future Projects
In future projects, we will be extending this project in steps:
Project 2: Storing spreadsheets in a database.
Project 3: Making them accessible via web services.
Projects 4 and 5 Adding browser UI(s) which use the web services to access and modify spreadsheets.
Requirements
You must push a submit/prj1-sol directory to your main branch in
your github repository such that typing npm ci within that directory
followed by node ./dist/index.js is sufficient to run your project.
You are being provided with an index.ts and cli.ts which provide the required input-output behavior. You are also being provided with a parser which can parse spreadsheet formulae. What you specifically need to do is add code to the provided spreadsheet.ts source file as per the requirements in that file.
Additionally, in order to avoid pain points in future projects, your
submit/prj1-sol must contain a vm.png image file to verify that
you have set up your VM correctly. Specifically, the image must show
an x2go client window running on your VM. The captured x2go window
must show a terminal window containing the output of the following
commands:
$ hostname; hostname -I
$ ls ~/cs544
$ ls ~/i?44
$ crontab -l | tail -3
Interaction Log
The behavior of your program is illustrated in the following annotated log.
$ node .dist/index.js
>> a1 = 22
{ a1: 22 }
>> a2 = a1 * b1    //b1 not yet defined; defaults to 0
{ a2: 0 }
>> b1 = 3
{ a2: 66, b1: 3 }  //b1 now defined; a2 recomputed
>> a3 = a1 + a2
{ a3: 88 }
>> a1 = 3          //a1 redefined; a2 and a3 recomputed
{ a1: 3, a2: 9, a3: 12 }
>> a1 = a3         //indirect circular references detected
CIRCULAR_REF: circular ref involving a1
>> a1 = a3 -       //syntax errors detected
SYNTAX: unexpected token at '<EOF>': expected 'num'
>> a1=a1           //direct circular refs detected
CIRCULAR_REF: circular ref involving a1
>>                 //indicate EOF on stdin by typing ^D
$
Provided Files
The prj1-sol directory contains a start for your project. It contains the following files:
- spreadsheet.ts
This skeleton file constitutes the guts of your project. You will need to flesh out the skeleton, adding code as per the documentation. You should feel free to add any auxiliary classes, functions or method definitions as required.
- index.ts and cli.ts
These files provide the input-output behavior which is required by your program. It imports spreadsheet.ts. You should not need to modify these files.
- expr-parser.ts
A parser for spreadsheet formulae. You do not need to understand the details of the operation of the parser and scanner but do need to understand the behavior of the exported
parseExpr()function as well as theAsttype and theCellReftype.- utils.ts and limits.ts
Utility routines and definitions for the spreadsheet limits. You should not need to modify these file.
- Test files
This directory contains tests for the spreadsheet, scanner and parser using the mocha testing framework and chai assertions. You may add your own tests to this directory.
- tsconfig.json
A configuration file for typescript. You may modify this file if necessary.
- README
A README file which must be submitted along with your project. It contains an initial header which you must complete (replace the dummy entries with your name, B-number and email address at which you would like to receive project-related email). After the header you may include any content which you would like read during the grading of your project.
Design and Implementation
The following information may be useful when working on this project.
Use of ES6 Classes
At the time of assigning this project, JavaScript objects and ES6
classes will not have been covered in detail in the course. However,
you should be able to use ES6 class syntax without needing to
understand the finer points.
Note that the class syntax is a relatively recent addition to
JavaScript and is syntactic sugar around JavaScript's more flexible
object model. Note that even though the use of this class syntax
may make students with a background in class-based OOPL's feel more
comfortable, there are some differences worth pointing out:
All "instance variables
" must be referenced through thethispseudo-variable in bothconstructorand methods. For example, if we want to initialize an instance variablecellsin theconstructor()we may have a statement like:this.cells = {};after providing a suitable declaration for
cells.There is no implicit
this. If an instance method needs to call another instance method of the same object, the method must be called throughthis.
Tests
The provided code contains tests for the provided scanner and parser as well as tests for the spreadsheet you are working on. The spreadsheet tests will initially fail; as you develop your code, you will make them succeed, thus practising TDD. You are welcome to add more tests (note that different tests than those provided here may be used when grading your project).
If you set up your package.json as instructed, typing npm test
should run all tests using the <https://mochajs.org/> mocha testing
framework.
You can run only a single test by replacing the call to the it(...)
function defining the test with it.only(...). You can run only a
single test suite by replacing the call to the describle(...)
function defining the suite with describe.only(...).
Cell References vs Cell ID's
It is a good idea to distinguish between references to a spreadsheet cell and the ID for a spreadsheet cell.
A string cell reference is used within a formula to refer to a cell. It can be a fully relocatable reference like
f6, a partially relocatable reference like$f6orf$6or a fully non-relocatable reference like$f$6.A cell ID could be any string which uniquely identifies a cell. It seems convenient to reuse the same identification scheme as that used externally; i.e. simply use ID's like
f6to identify a cell. So a cell ID looks like a fully relocatable cell reference. Note that a cell ID cannot contain any$characters.A CellRef can be a data structure representing a string cell reference. It can contain two coordinates containing the indexes of the cell column and row and an indicator whether each index is relative or absolute.
For example, the string cell reference
c5relative to cell ida1will have theCellRef{ col: { index: 2, isAb: false }, row: 4, isAbs: false }while
f$4relative to cell idh2will have theCellRef{ col: { index: -2, isAbs: false }, row: 3, isAbs: true }
Spreadsheet Representation
The visual representation of a spreadsheet is a 2-dimensional grid which seems to map naturally into using a 2-dimensional array as the internal representation. But since the grid is usually extremely sparse, a spreadsheet is better represented simply as a JavaScript object mapping cell ID's to information about a cell.
The information associated with a spreadsheet cell could include properties like the following:
-
id The ID associated with the cell.
-
expr The string expression for the cell.
-
ast Caching of the AST corresponding to the
expr.-
value A number containing the currently computed value for the cell. Should default to 0.
-
dependents A Set of id's for cells which are directly dependent on this cell. This set specifies the destinations of the outgoing edges in an adjacency list representation of the dependency DAG.
In some situations it may also be useful to have a cell contain a reference back to its containing spreadsheet.
Evaluating the Value for a Cell
Given an arithmetic expression represented as a string, its
essential structure can be captured by an abstract syntax tree or
AST. Note that the expressions "1 + 2*3" and "(1 + (2*3))" both
have the same essential structure and will be represented using
equivalent AST's. These AST's will be different from the AST
for the expression "(1 + 2) * 3".
The formulas to be handled by this project are arithmetic expressions
involving the arithmetic operators +, - (both prefix and infix),
*, and /, functions like max() and min() (the provided
code restricts these functions to take exactly 2 arguments),
as well as numbers and cell references. The latter two will be
represented as AST leaves, whereas the operators and functions will be
represented as internal nodes of the AST.
Evaluating the value for a cell can be done using a simple bottom-up recursive traversal of the AST for the formula associated with that cell. This can be done using a simple case analysis on the type of the AST node.
The node represents a number: the value is simply that number.
The node represents a cell reference: the value is simply the value of the cell referenced by the AST.
The node represents the application of an operator or function: the value is the result of applying that operator or function to the result of recursively evaluating the children of that node.
Maintaining the Dependency DAG
When a cell \(C\) is updated with a new formula with corresponding AST, the following steps need to be taken to maintain the dependency DAG:
If \(C\) already has an associated old formula, then that old formula should be traversed for references to prerequisite cells and \(C\) needs to be removed as a dependent of the prerequisite cells. This ensures that the DAG does not contain spurious dependencies
The new formula needs to be traversed for references to prerequisite cells and \(C\) needs to be added as a dependent of those prerequisite cells.
When traversing formula, it is easier to perform a recursive traversal of the AST associated with the formula rather than the string formula.
For example, assume that a4 currently has the formula a3 * b3 and
is being updated with a new formula a4 = a3 + a5. The old formula
a3 * b3 must be traversed to remove a4 from the dependents for
the referenced prerequisite cells a3 and b3. Then the new formula
a3 + b5 must be traversed to add a4 to the dependents for the
referenced prerequisite cells a3 and b5.
Error Reporting
All methods which may produce errors must return a Result which wraps either the success result or any encountered errors. The details of using this wrapper were covered in class in the Practical Considerations slides.
To unwrap a result: Result<T> use code like the following:
if (result.isOk) {
  value: T = result.val;
  //process value
}
Usually if the result is not okay, then it suffices to return that error result to the caller:
if (!result.isOk) return result;
A simple way to return a successful result value is to use the
okResult() utility function:
return okResult(value);
A simple way to return an error result would be to use the
errResult() utility function:
if (circular dependency detected) {
  const msg = `cyclic dependency ...`;
  return errResult(msg, 'CIRCULAR_REF');
}
Error Recovery
An update to a spreadsheet will entail multiple updates to individual properties of different cells, but the overall spreadsheet update should be atomic; i.e. an update either succeeds completely or leaves the spreadsheet totally unchanged when an error is detected.
For example, assume that cell a1 is set to 22 and a2 is set to
a1 + 1 which is 23. Note that a2 is dependent on a1 and any
update to a1 will result in update to a2. Assume that a1 is
attempted to be set to the formula a2 * 2 introducing a circular
dependency. Depending on the implementation, it is possible that a1
will be set to 46, before the circular dependency is detected and the
update aborted. Such partial updates are not acceptable and need to
be rolled back.
So when an error is detected, it is necessary to completely rollback any partial updates. Some possibilities to implement this rollback:
Implement an Undo Capability
Before updating a property of a spreadsheet cell, remember the previous version of the property in some kind of undo object which tracks the cell, property name and original value. Add each undo object to a stack of undo objects associated with the spreadsheet.
If the full spreadsheet update succeeds, simply discard the undo objects. OTOH, if an error occurs then use the saved stack of undo objects to restore the state of the spreadsheet to what it was before the attempted update.
Note that when a property contains a mutable data structure like an array or a set, remembering the previous state of that property will require making a deep copy of the data structure before mutating it.
One advantage of this approach is that its use need not be restricted only to rollback after an error; it can also be used for implementing an external undo/redo capability.
Note that this is related to the Memento pattern.
Use Shadow Cells
When it is necessary to update a cell, do not make the update directly to the cell. Instead implement the update on a shadow cell which is a deep copy of the original cell. Route subsequent reads and writes for that particular cell to the shadow cell.
If the full spreadsheet update succeeds, then copy the shadow cells back into the original cells. OTOH, if an error occurs then simply discard the shadow cells.
Use Immutable Data Structures
Using persistent data structures for implementing the spreadsheet would obviate the necessity to undo updates after an error.
Hints
You should feel free to use any of the functions from the standard library; in particular, functions provided by the Array, String, Set and Math objects may prove useful. You should not use any nodejs library functions to make it possible to run this code within the browser in future projects. You should also not need to include additional npm packages.
The following steps are not prescriptive in that you may choose to ignore them as long as you meet all project requirements.
If you have not already done so, set up your course VM as per the instructions specified in the VM Setup and Git Setup documents.
Understand the project requirements thoroughly including the comment for the
eval()method in spreadsheet.ts. Verify your understanding by looking at the provided interaction log.Make sure you understand the behavior of the
parseExpr()function provided by expr-parser.ts including theAstandCellReftypes.Decide on how you will implement error recovery.
Look into debugging methods for your project. Possibilities include:
Logging debugging information onto the terminal using console.log() or console.error().
Use the chrome debugger as outlined in this article. Specifically, use the
--inspect-brknode option when starting your program and then visitabout://inspectin your chrome browser.If you have trouble getting to the function you want to test, add a line containing the word
debuggerat the point at which you would like to get debug control.
It is well worth spending a few minutes setting up the chrome debugger as it could save you a lot of debugging time.
Start your project by creating a new
prj1branch of youri444ori544directory corresponding to your github repository. Then copy over all the provided files:$ cd ~/i?44 $ git checkout -b prj1 #create new branch $ mkdir -p submit #ensure you have a submit dir $ cd submit #enter project dir $ cp -r ~/cs544/projects/prj1/prj1-sol . #copy provided files $ cd prj1-sol #change over to new project dirSet up this project as an npm package:
npm init -y #create package.json
Commit into git:
    $ git add .   #add contents of directory to git
    $ git commit -m 'started prj1' #commit locally
    $ git push -u origin prj1      #push branch with changes
                                   #to github
[To avoid loosing work, you should get into the habit of periodically
commit'ting your work andpush'ing it to github.]Replace the
XXXentries in theREADMEtemplate and commit to github:$ git commit -a -m 'updated README' $ git pushCapture an image to validate that you have set up your course VM as instructed. Within a terminal window in your
x2goclient window, type in the following commands:$ hostname; hostname -I $ ls ~/cs544 $ ls ~/i?44 $ crontab -l | tail -3[The last command assumes that you to have set up a cron job when setting up git].
Use an image capture program on your workstation to capture an image of your
x2goclient window into a filevm.png. The captured image should show the terminal window containing the output of the above commands as part of thex2goclient window. Move thevm.pngfile from your workstation to your VM's~/?44/submit/prj1-soldirectory (you can usescp; if your workstation cannot connect directly to your VM, then do a two step copy usingremote.csas an intermediate).Add, commit and push the
vm.pngfile.Replace the
scriptssection of your previously generatedpackage.jsonwith the following lines:"clean": "shx rm -rf dist", "build": "tsc", "watch": "tsc --watch", "pretest": "npm run build", "test": "mocha --reporter-options maxDiffSize=128000 dist/test", "predebug-test": "npm run build", "debug-test": "mocha --inspect-brk dist/test"Since
package.jsonuses strict JSON syntax, be careful to avoid trailing commas.-
clean Removes the
distdirectory which is specified as thetscoutput directory by the provided tsconfig.json.-
build Run the
tsccompiler using options specified by tsconfig.json.-
watch Rerun the
tsccompiler when any of the source files change.-
test Run all generated tests in the
dist/testdirectory. ThemaxDiffSizereporter option allows seeing large diffs produced for failing full table tests. Thepretestscript will automatically be run beforetest, ensuring that the build is always up-to-date before testing.-
debug-test Like
test, but pause until connected to by the chrome debugger.
-
Add the declaration
"type": "module",after thescriptssection inpackage.json. This ensures that nodejs understands ES20importandexportstatements in the JavaScript files generated by the TypeScript compilertsc.Use
npm install -Dto install the following packages as development dependencies:@types/chai,@types/mocha,@types/node,typescript,chai,mochaandshx.The
@types/*packages provide the typescript compiler with information about the types exported by the respective JavaScript projects.Installing
typescriptensures your project uses a project-specific typescript installation (rather than the one installed system wide on your VM).mochais the framework used for testing, withchaibeing used for providing assertions to mocha.shxallows portable execution of some selected user commands; note that this will allow the commands to also be used on Windows.
Also install the
cs544-js-utilslibrary which will be needed both during development and when running your project:$ SITE=https://sunybing:sunybing@zdu.binghamton.edu $ npm install $SITE/cs544/lib/cs544-js-utils-latest.tgzCompile the project using
tscornpm run build.You should be able to run the project, but except for error checking performed by
cli.ts, all cell definitions will simply return empty objects until you replace the TODO sections with suitable code.$ node ./dist/index.js >> a1 input must be of type "cellId = expr" >> aa1 = 3 SYNTAX: bad cell ref aa1 >> a1 = 3 {} >> #type ^D to return to the shell $You should be able to run the tests using
npm test. All theparseandscantests should succeed, but all thespreadsheettests will fail. You will need to add code to make all the tests green.Open your copy of the
spreadsheet.tsfile in your project directory. It containsImports of auxiliary modules.
A factory function for creating a
Spreadsheetwhich is exported as thedefault exportof the file.An exported skeleton
Spreadsheetclass. It contains a skeleton constructor as well as a skeleton for the requiredeval()method.A table mapping
fnstrings to the corresponding functions.
Some points worth making about the provided code:
All the methods have been declared
async. This is not needed for this project, but will be necessary for subsequent projects. You can safely ignore theasyncdeclarations and write code normally.Note that TypeScript requires that
asyncmethods must return aPromisewrapping the result. For example, theeval()method you are required to implement returns aPromise<Result<Updates>>whereUpdatesis the essential happy path return value, theResult<>wrapper handles errors and thePromise<>wrapper handles theasyncresult.
Create an auxiliary
CellInfoclass to package up the information associated with a spreadsheet cell.Add code to the
Spreadsheetconstructorto set up an object mapping cell id's toCellInfo's.Add code to the
eval()method to print out the AST for a formula:Parse the
baseCellIdexprformula using the provided parse() function into an AST (unwrap the AST).Print out the AST using
console.log(JSON.stringify(ast, null, 2));
Execute the project with input like
a1 = 22ora2 = 3 * ($a4 + b$5)and you should see the printed AST on your console.As you develop the project, you may find it useful to print AST's in order to understand their structure.
Write an auxiliary method to evaluate an AST which simply contains a number. This auxiliar method should do a switch on the
kindof the AST node. For now, simply handle the case when thekindisnumand simply return the node'svalueproperty as the evaluation.If you hook up your auxiliary function into the main
eval()function correctly, you should be able to make the first spreadsheet test green!In this step you will evaluate spreadsheet formulae like
a1 = 1 +
    2 * -3
which do not contain any cell references.Extend your AST evaluation method to handle
appnodes. Recursively evaluate thekidsto get a list of kid values. Then lookup the function corresponding tofnin the providedFNStable. Then simply apply the returned function to the list of kid values (you may assume that all functions take up to 2 arguments).You should now be able to make the second spreadsheet test green!
Now extend your evaluation function to handle cell references. The AST represents cells using (possibly relative) row and column indexes. Hence you will need to add an additional argument to your evaluation function to represent the base cell relative to which the AST is being evaluated.
The
CellReffor a cell having cell-idbaseCellIdcan be obtained usingCellRef.parse(baseCellId).Calling the
ast.toText(baseCellRef)on that AST node will return the cell coordinates as a string-ref likec33or$d23.You can then convert the string-ref to a cell-id to look up the cell value using your spreadsheet data structure.
This should make the next two tests green.
Set up your spreadsheet data structure so that looking up the value of an unassigned cell returns 0; that should take care of one more test.
Now set up dependency tracking.
When a formula is being assigned to a base call \(B\) which already has an existing formula, remove \(B\) from the dependents of cells referenced by the existing formula.
When evaluating a cell reference to cell \(C\) in the formula for base cell \(B\), add \(B\) to the dependents of cell \(C\).
When a cell is evaluated, all its dependent cells need to be evaluated too. But these evaluations can cascade. This can be done using a depth-first search. To detect cyclic dependencies, maintain a set of the cell id's which are currently being evaluated and stop the cascade when an attempt is made to re-evaluate a cell which is already on the list.
Modify your code to add in your chosen error recovery strategy.
Iterate until you meet all requirements and all tests are green.
It is a good idea to commit and push your project periodically whenever you have made significant changes. When it is complete please follow the procedure given in the git setup document to submit your project to the grader via github.