Project 4
Due: July 30, before midnight
Important Reminder: As per the course Academic Honesty Statement, cheating of any kind will minimally result in your letter grade for the entire course being reduced by one level.
This document first describes the aims of this project followed by a brief overview. It then lists the requirements as explicitly as possible. It describes the files with which you have been provided. Finally, it provides some hints as to how the project requirements can be met.
Aims
The aims of this project are as follows:
Overall Architecture
In this project you will be interacting with three programs shown in the following block diagram:
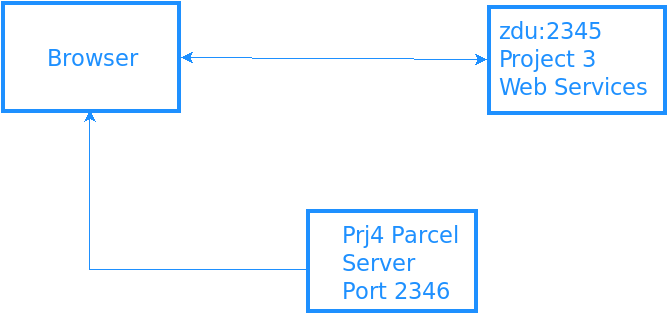
The project involves two servers:
A server which implements web services for spreadsheets. This is the server you essentially implemented in your previous project. You can use the already running server on <https://zdu.binghamton.edu:2345> or a local instance running on
https://localhost:2345.A development server run by the parcel bundler on port 2346 which makes it possible to load all your project files into a browser. Note that this server is not used once the project has been loaded into your browser, making the project a Single-Page App.
All the code you implement in this project will run entirely within a browser, which typically will be running on your VM. The JavaScript code will be loaded into the browser from the parcel server. Once loaded into the browser, this code will make direct requests to the web services server using the fetch API.
Requirements
You must push a submit/prj4-sol directory to your github repository
such that typing npm ci within that directory followed by tsc and
npm start will start a web server on localhost at port 2346. This
server should provide access to a single-page app which should allow
displaying spreadsheets.
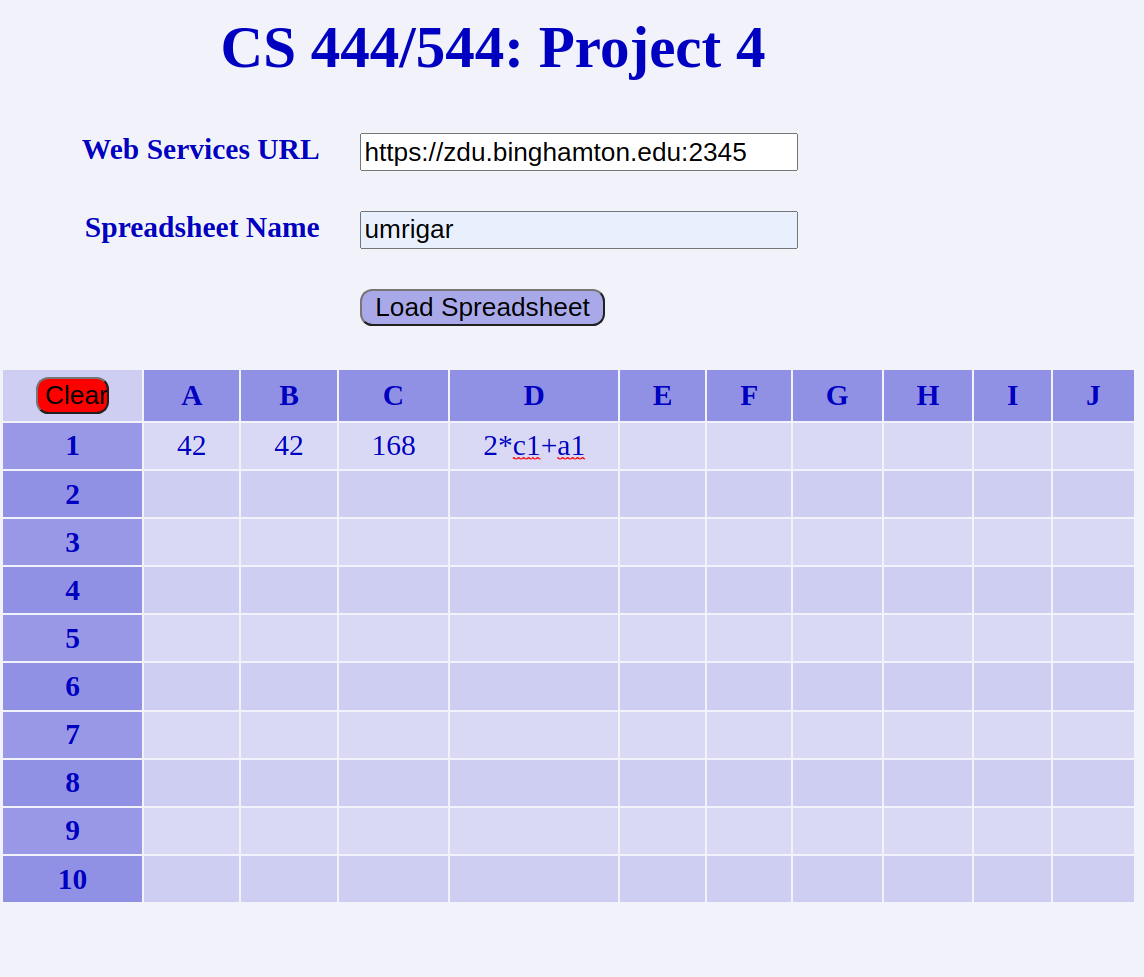
The app should render a spreadsheet as shown below (the image was captured
with cell d1 focused):
The operation of the app is illustrated in this video.
You will need to modify the provided spreadsheet.ts and ss-ws.ts files to implement the application. You are being provided with all the static HTML for your project as an index.html file.
Provided Files
The prj4-sol directory contains a start for your
project. It contains the following files:
- spreadsheet.ts
A skeleton file which is responsible for implementing the spreadsheet display and behavior. This is where you will add most of your code.
- ss-ws.ts
A skeleton file which should call Project 3 web services to implement an object exporting largely the same interface as SpreadsheetServices from the library provided for the solution to Project 2 (this library was also used by your previous project). You will be updating this file to implement a core method.
- app.ts
This file sets up the top level UI for the application. You should not need to change this file.
- utils.ts
This file contains utility code. It exports an
Errorclassused for displaying errors and amakeElement()function which is a thin convenience wrapper around the DOM API to create DOM elements. You may add to this file if necessary.- index.ts
The top-level JavaScript file which is included by
index.html. It creates an instance of the overall application once the DOM of the static index.html is ready in the browser. You should not need to modify this file.- index.html
The top-level entry page for the application. It simply provides the page heading and a container into which the app is dynamically rendered. You should not need to modify this file.
- style.css
A crude stylesheet for the project referenced by index.html. You should not need to change it.
- package.json
A
package.jsonfile for this project which lists all necessary npm scripts and dependencies. You should not need to modify this file.- tsconfig.json
A configuration file for the
tscTypeScript compiler. You should not need to modify this file.- .gitignore
A file telling git the paths which should not be committed to the repository. You should not need to modify this file.
- README
A README file which must be submitted along with your project. It contains an initial header which you must complete (replace the dummy entries with your name, B-number and email address at which you would like to receive project-related email). After the header you may include any content which you would like read during the grading of your project.
The extras directory contains a sample of the generated HTML:
- ss-table.html
This captures the dynamic HTML for the spreadsheet table corresponding to the above image.
- test2-ss.json
A file containing test data for a spreadsheet.
Browser API
It is a good idea to review some of the browser API's you will need for this project:
Fetch API
The fetch() API will be used in this project to access Project 3 web services:
    fetch(url, {
      method: method,
      headers: {
        'Content-Type': 'application/json',
      },
      body: JSON.stringify(data)
    })
is used to send an HTTP method request to url sending data
as JSON in the request body. This can be used to call the
Project 3 Web Services with code outlined
by the following pseudo-code:
    try {
      const response =
        await fetch(url, { method, body });
	const data = await response.json();
        if (data has errors) {
          return error result;
	}
	else {
	  return success result;
	}
      }
      catch (err) {
        return error result;
      }
    }
DOM API
To build HTML dynamically in the browser you may find some of the following APIs useful:
el.querySelector(sel): This returns the first element selected by CSS selector
selwithin elementel.el.querySelectorAll(sel): This returns a
NodeListcontaining all elements selected by CSS selectorselwithin elementel.Note that
NodeListis not a full-fledged JavaScript array. Though it does allow iteration usingforEach(), it does not support array methods likemap()andjoin(). AnodeListcan be converted into a full-fledged array by spreading it into an array using[...nodeList].addEventListener() can be used to add an event listener to a target element.
The event listener (aka handler) will be called with an event
evas its first argument. It is important to distinguish betweenev.currentTargetandev.targetas they may not be the same. The former refers to the element which registered the event, whereas the latter refers to the element which initiated the event.For example, assume that a
<button>element contains a<span>element and the<button>element registers aclickevent. If the user clicks on the contained<span>element, thenev.targetwill reference the<span>element, whereasev.currentTargetwill reference the<button>element. This is important to keep in mind if the event handler tries to extract some attributes from the event target. See this MDN article.It is also important to understand
thiswithin an event handler. If the handler is defined using an arrow function, then as usual,thiswill be inherited from the context within which it was defined. OTOH, if the handler is defined using afunctionkeyword, thenthiswill be always be set toev.currentTarget.So if a handler defined as a regular class method needs to refer to the instance of the class, then it will typically be necessary to rebind
thisfor those methods so that it will reference the object instance rather than the DOM element which registered the handler.OTOH, this is not necessary if a handler is defined using a class property initialized to a fat-arrow function since fat-arrow functions inherit
thisfrom the surrounding context; i.e.thiswill reference the object instance.innerHTML is a read/write property representing the serialization of an element's children into HTML. Note that assigning to this property will dynamically parse the inserted HTML and insert the results of the parse into the DOM.
In particular, assigning an empty string to the
innerHTMLproperty of an element will clear out that element.textContent allows accessing the text content of a DOM node and its children. Note that unlike
innerHTML, assigning totextContentdoes not parse the inserted content; this makes it a much safer alternative toinnerHTMLavoiding cross-site scripting attacks.
createElement(tagName): Can be used to create an element.
el.getAttribute(name): This can be used to retrieve attribute name from element el.
el.setAttribute(name, value): This can be used to set attribute name to value for element el.
Every element has a classList property which is convenient for manipulating the classes associated with that element using its add(), remove(), replace() and toggle() methods. Changing the classes for an element can be used to change the styling associated via those classes for the element.
el.append(...elementOrText): The can be used to append one-or-more elements or text strings to the content of element
el.
Note that the makeElement() function provided in
utils.ts implements a wrapper
around
createElement() and
setAttribute().
URL
The URL
API provides an easy way to build properly escaped URLs. Of
particular interest is the searchParams property which can be used
to build up properly escaped query parameters.
The usage will be something like
const searchUrl = new URL(wsUrl);
const qParamName = ...;
const qParamValue = ...;
searchUrl.searchParams.set(qParamName, qParamValue);
//url.href contains properly escaped URL with ?qParamName=qParamValue
Parcel Bundler
This project will use the parcel bundler to
bundle multiple JavaScript, HTML and CSS files together and serve them
to the browser in a single bundle. Parcel is pointed to the root of
an app like an index.html page and bundles together all direct and
indirect dependencies. It also provides a development server with
Hot
Module Replacement HMR which makes the development experience
reasonably pleasant.
Parcel's HMR is not 100% reliable. If you are getting behavior which does
not make sense, it is probably a good idea to stop the parcel server,
remove the .parcel-cache and dist directories and restart with a clean
slate. You can do this easily by using npm run clean.
If you have syntax errors in your code, the browser displays the errors on a black background. Again, if those errors don't make sense, it is a good idea to try a clean restart of the parcel server to see if they disappear.
Changes in Project 3 Web Services
This project requires a minor backward compatible change in
Project 3 Web Services to facilitate loading of
a spreadsheet. Specifically, the Get-Spreadsheet service GET
BASE/SS_NAME takes an additional optional doValues query
parameter.
If this query parameter is specified, then the service will return a success envelope
resultcontaining an array of[ string, string, number ]triples representing the[CELL_ID,EXPR,VALUE]for all non-deleted cells in spreadsheetSS_NAME.If this query parameter is not specified, then the service will act as in Project 3 returning a success envelope
resultcontaining an array of[ string, string ]pairs representing the[CELL_ID,EXPR]of all non-deleted cells in spreadsheet SS_NAME.
Error Architecture
Project 3 web services return errors using a response of the form:
    { isOk: false,
      status: number,
      errors: [ { message, options?: { code?, widget? }, } ],
    }
This will need to be converted into an error Result similar to that
from your earlier projects. It is also possible that the fetch()
request itself fails, resulting in an exception. That exception too
will need to be converted into an error Result.
Given an erroneous response, the application needs to display the
errors. The Errors class provided by
utils.ts can be used to display
a list of errors within a top-level <ul class="error"
id="errors"></ul> container generated within the top-level UI.
The Spreadsheet in the Client
The spreadsheet will be implemented as a table within a browser in the
obvious way. Each spreadsheet cell will be implemented as a editable
<td> element having its class attribute set to cell and its id
attribute set to the cell ID (like a1, d7, etc).
This project will also maintain all spreadsheet data within the DOM using attributes. Recall from class that the HTML standards allow custom data-* attributes.
We will using the custom attribute
data-valueon a spreadsheet cell element to hold the value of the cell.We will using the custom attribute
data-expron a spreadsheet cell element to hold the expression associated with the cell.
Focusing a cell should display its expression (grabbed from its
data-expr attribute); unfocusing a cell should display its value
(after any possible updates).
When the contents of a cell is copied (using ^C), then the cell being
copied is indicated visually by giving it a dotted border. This can
be achieved by giving the cell element a class attribute containing
is-copy-source.
Hints
The following points are worth noting:
As in your earlier projects,
tscputs its JavaScript code in thedistdirectory. Since this directory contains only generated code, it can safely be deleted and should not be submitted along with the source code for the project.Parcel uses the
targetdirectory to hold its bundles and.parcel-cacheas a cache. These directories too can be safely deleted and should not be submitted along with the source code for the project.There are two scripts in the provided package.json which you can use when developing your project:
npm run watch: this will runtscin watch mode: changes to any file previously compiled bytscwill cause it to be recompiled.npm start: parcel will bundle all application resources together in thetargetfolder and start a development server running on port 2346. This server too runs in watch mode; any changes in any of its dependent files should result in the server restarting.
Ideally, changing a
.tsfile should cause it to be recompiled into thedistdirectory which should then result in the parcel server restarting. This works most of the time but is not 100% reliable.If you encounter a situation where a change you made is not being reflected in the browser, then remove all generated directories using
npm run cleanwhich does the equivalent of:$ rm -rf dist target .parcel-cache
and then restart the above servers.
There are two parts to this project:
Accessing the Project 3 web services using the browser's
fetch()API.Using the DOM API to implement the application.
You will need to set up the following handlers:
A handler to clear the spreadsheet.
A handler which will be run when a spreadsheet data cell is focused.
A handler which will be run when a spreadsheet data cell loses focus.
A handler which will be run for a copy action on a spreadsheet data cell.
A handler which will be run for a paste action on a spreadsheet data cell.
When you ask the DOM for an element using methods like querySelector(), TypeScript believes that the call may fail returning a
nullif the element does not exist. If you are sure that the element must exist, you can let TypeScript know by adding a non-nullassertion to the call using a postfix!operator as indocument.querySelector('#clear')!.Your browser will be making requests to the web services running on
zdu:2345orlocalhost:2345. The browser will usually fail the requests since the services use a self-signed web certificate. Hence it is imperative that you point your browser to <https://zdu.binghamton.edu:2345> or <https://localhost:2345> and click through the certificate warnings so that your application will have access to the web services.It should go without saying that you should always refactor your code into small well-defined methods. In typescript you can make implementation details private by using the
privatekeyword.
The following steps are not prescriptive in that you may choose to ignore them as long as you meet all project requirements.
Read the project requirements thoroughly. Look at the video to make sure you understand the necessary behavior. Review all the material covered in class.
Glance through the docs for APIs linked earlier in this document.
Set up your
prj4-solbranch andsubmit/prj4-solas per your previous projects. Note that the providedprj4-solstarter directory already contains apackage.json.Install all dependencies using
npm install.If you decide to run your own instance of Project 3 Web Services, then start up the Project 3 server on your VM. Note that since there is a minor change in those web services, you should be running the server provided in prj3-sol.
You do not need to do this step if you are using the Project 3 web services running on
zdu:2345.Set up your browser to accept self-signed certificates for Project 3 web services.
You should now be able to run the project. First use
npm run watchto runtscwith awatchoption for automated recompiles followed by$ npm start
in another terminal.
This will run the parcel developmental server on port 2346.
If you point your browser to <http://localhost:2346>, you should see a page containing the input widgets for specifying the web service URL and spreadsheet name. Providing inputs for these widgets should allow you to "load
" a spreadsheet, displaying an empty table. You will be able to type into the table cells but your input will be ignored.Replace the
XXXentries in theREADMEtemplate and commit your project to github.Open your copy of the skeleton file ss-ws.ts. Look through the definition of the
SpreadsheetWsclass. Notice that all its methods are simple wrappers which calldoFetchJson().The header for
doFetchJson()is towards the end of the file but its implementation is incomplete. Implement the function as per its specs. Use the docs for fetch() and the specs for the response envelope from Project 3.Open your copy of spreadsheet.ts. Look through the provided code. The fully implemented
makeEmptySS()method renders an emptyN_ROWS\(\times\)N_COLSspreadsheet<table>. The unimplementedaddListeners()method is to be used by you for attaching listeners for different events on spreadsheet elements.Note that an instance of the
Spreadsheetis created with the followingreadonlyinstance variables:-
ws An instance of
SpreadsheetWswhich you implemented in the previous step.-
ssName The name of the spreadsheet.
-
errors An instance of the
Errorsclass defined in utils.ts which can be used for reporting errors within the browser.
You will be adding more instance variables as your project progresses.
-
Implement the
load()method as per its specs. You will need to call the appropriate web service using thewsinstance variable to get the ID, expression and value of each active cell.If the method returns an error result, then report the error(s) using the
errorsinstance variable.If the method returns a success result, then set up the corresponding spreadsheet cells in the DOM. For each cell specified in the result, simply access the corresponding element using its ID and update the element's
data-expranddata-valueattributes and also set itstextContentto the cell value.
You should now be able to load your spreadsheet. A successful load provides some validation for your implementation of
doFetchJson()in the previous step.Set up a handler for clearing the spreadsheet within the
addListeners()method. You can use document.querySelector() to get hold of the#clearbutton element and then useaddEventListener()to cause a"click"event to transfer control to a suitable handler.The handler should call the corresponding web service. If there are no errors, then it should reflect that success by clearing out the content and attributes of all
.cellelements.[Once you have successfully implemented this step, you will have cleared out all the data in your spreadsheet. You can restore the data for subsequent steps by directly using a Project 3 web service to reload it.
Use curl to invoke the load web service:
    $ curl -s -k -H 'Content-Type: application/json' \
         -X PUT -d @$HOME/cs544/projects/prj4/extras/test2-ss.json \
	 WS_URL/api/$USER
where
WS_URLis the URL which you are using for the Project 3 web services.]Implement cell focus behavior. For all
.cellelements set up a handler for thefocusinevent. The handler should simply set the cell's text content to the value of itsdata-exprattribute.Implement cell blur behavior. For all
.cellelements set up a handler for thefocusoutevent. The handler can assume that the target cell is currently focused; hence its text content will be the cell expression.The handler can read the text content of the target. This should be a spreadsheet expression which may have been edited by the user.
If the trimmed content is empty, then the handler can simply call the web service for removing a cell; otherwise it should call the web service for evaluating a cell.
Both web service calls have the same success result type: an object containing the values of updated cells. So updating the cells is a simple matter of iterating over this object and applying the corresponding updates and copying the text contents of the blurred cell into its
data-exprattribute.
There is one complication. Assume that you have focus in cell X and then blur cell X to focus on cell Y.
Blurring cell X will start one of the above web services (clear cell or evaluate). This event handler will suspend waiting for the web service result.
While the blur event hander for cell X is suspended, the focus handler for cell Y will run. It will set up cell Y to display its expression.
The web service call which suspended the event handler for cell X completes successfully. When the event handler for cell X continues its applies updates to all affected cells. If cell Y is among the affected cells, then its content will be set to the cell value.
The last step violates the assumption that the contents of a focused cell should always be the cell expression. Hence when it is blurred, the cell value will incorrectly get copied into its
data-exprattribute.
The fix is very simple: updates should not be applied to the currently focused cell. Hence the focus handler can remember the currently focused cell id in an instance variable, the updates should not be applied to this cell id and the blur handler for a cell can always clear out this instance variable.
You should now have basic spreadsheet functionality fully working.
Implement the copy-paste behavior by setting up handlers for
copyandpasteevents on every.cellelement. In an attempt to allow you to discover things for yourself, the hints given here are purposely vague.The
copyhandler does not need to copy anything into the clipboard; it should merely remember the cellId in an instance variable. It should also add in theis-copy-sourceclassattribute to the source cell element (this is used to style the dotted border around the source cell).The
pastehandler for a destination cell should invoke thecopyweb service using the destination cell ID along with the source cell ID remembered in the spreadsheet instance variable. A successful web service call should trigger an update of all affected cells (handling these updates is similar to handling the updates resulting from a blur and is a good opportunity to share code between the two different events). Note that the expression for the destination cell (which may be relocated from that for the source cell) can be obtained from thequeryweb service.Iterate until you meet all requirements.
It is a good idea to commit and push your project periodically
whenever you have made significant changes. When complete, please
follow the procedure given in the
git setup document
to merge your prj4-sol branch into your main branch and submit
your project to the grader via github.
Submit as per your previous project. Before submitting, please update your README to document the status of your project:
Document known problems. If there are no known problems, explicitly state so.
Anything else which you feel is noteworthy about your submission.
If you want to make sure that your github submission is complete,
clone your github repo into a new directory, say ~/tmp and then
do a npm ci to build and run your project.